Basic-Setup
This basic example is based on the use of Docker images
Keep in mind the path are setup so it works with hardlinks and instant moves.
More info HERE
Bad path suggestion
The default path setup suggested by some Docker developers that encourages people to use mounts like /movies, /tv, /books or /downloads is very suboptimal and it makes them look like two or three file systems, even if they aren’t (Because of how Docker’s volumes work). It is the easiest way to get started. While easy to use, it has a major drawback. Mainly losing the ability to hardlink or instant move, resulting in a slower and more I/O intensive copy + delete is used.
But you're able to change this, by not using the pre-defined/recommended paths like:
/downloads=>/data/downloads,/data/usenet,/data/torrents/movies=>/data/media/movies/tv=>/data/media/tv
Note
Settings that aren't covered means you can change them to your liking or just leave them on default.
Accessing your settings
Edit => Preferences will bring up your option window once you have launched Deluge for the first time.
Downloads
Once you are here, you can edit your download settings in the Downloads section.
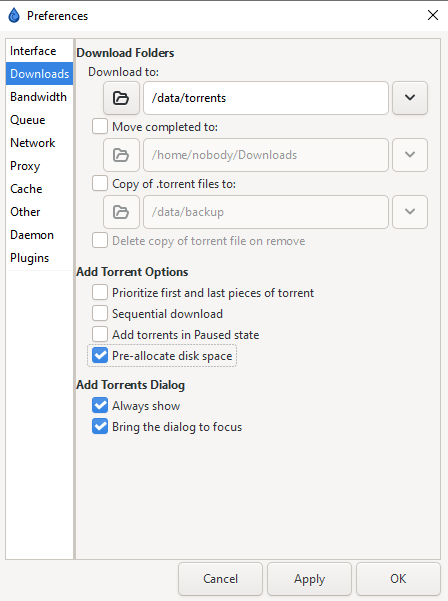
Download Path
Download to is where you want you want Deluge to download your media. If you want to move your files upon completion - check the box and enter a path for that option as well.
Saving .torrent Copies
Copy (and delete upon removal) of the .torrent file upon completion.
Suggested: Personal preference
Pre-allocated Files
Pre-allocate disk space for the added torrents. This limits fragmentation and also makes sure if you use a cache drive or a feeder disk, that the space is available.
Suggested: Enabled
ATTENTION
- You set your download location in your download client
- Your download client ONLY downloads to your download folder/location.
- And you tell Radarr where you want your clean media library
- Starr Apps import from your download location (copy/move/hardlink) to your media folder/library
- Plex, Emby, JellyFin, or Kodi should ONLY have access to your media folder/library
 Your Download and Media Library should be **NEVER the same locations**
Bandwidth
Here you can set your rate limits, meaning your maximum download/upload/connections.
Info
In Deluge, the value of -1 is used for "infinity" or "unlimited".
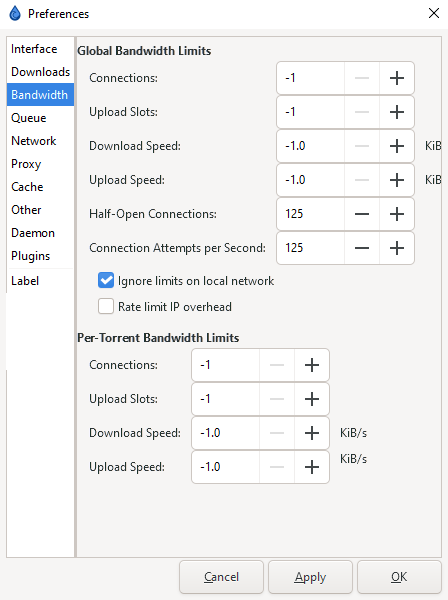
The best settings depend on many factors.
- Your ISP speed.
- Your hardware.
- Bandwidth needed by other services in your home network.
Suggested: For a home connection that you use with others it's best practice to set the upload/download rate to about 70-80% of your maximum upload/download speed.
Global Bandwidth Limits
These are the client-wide settings, they will apply to the total traffic of all torrents.
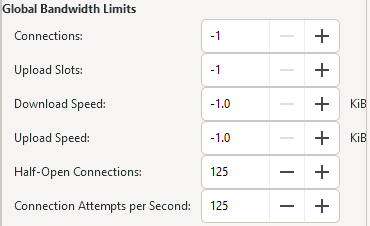
Tip
The only thing you NEED to place a limit on is half-open connections and connections per second.
For most high-speed broadband connections ~100-150 seems ideal. If you experience lag when initiating a download, try lowering these values.
Per-Torrent Limits
In addition to global limits, you can set limits per torrent.
Info
If you only wish to apply global limits, set all of these to -1.

Queue
These settings are intended to manage your number of active seeds, downloads, and uploads.
Info
In Deluge, the value of -1 is used for "infinity" or "unlimited".
Active Torrents
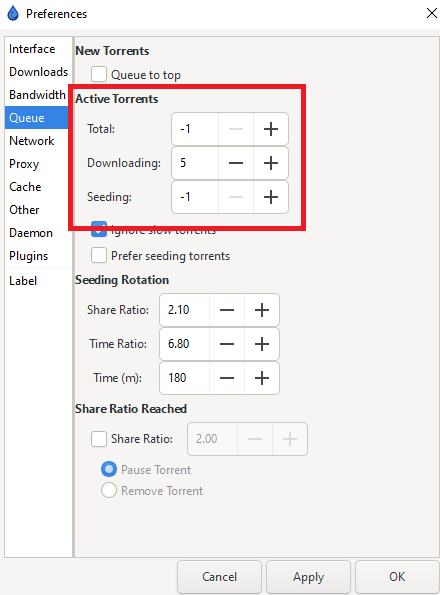
Unless you have a specific reason, Total can be set to -1. These are torrents seen as seeding by the tracker.
Seeding is the number of active torrents uploading, and Downloading is the number of concurrently downloading torrents.
Seeding Rotation & Share Ratio
I recommend using the seeding goals in your Starr Apps indexer settings (enable advanced) to remove completed downloads. These sections are then not necessary.
Network
This is where you will bind Deluge to a specific interface/address, specify port usage, and disable network protocols.
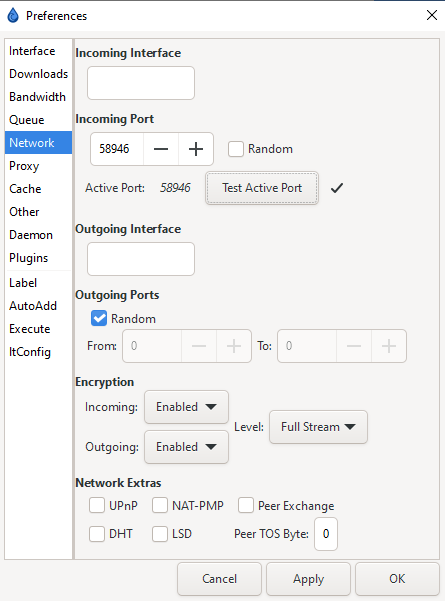
Incoming Port
You've followed the Setup TorGuard for port forwarding and want to know where in your download client you should add the port you've port forwarded.
Incoming Port should be set to a specific port that you have opened/forwarded (if you are behind any NAT/Firewall/VPN.)
Warning
Default ports of 6880-6890 are not recommended.
Make sure you click Test Active Port and get a ✓ before moving on.
Suggested: Critical
Encryption
Encryption should be enabled on both Incoming and Outgoing. The default Level of Either will accept both encrypted and standard connections.
Suggested: Level = Full Stream
Network Extras
You can configure your network protocols in this section. Depending on which type of tracker you use, some of these will be beneficial while on other trackers (private) it will put you at risk of being banned/disabled.
Warning
Please read this section carefully.
-
UPnP and NAT-PMP should be both disabled in your router, as well as in Deluge, as they can pose security risks.

Suggested:
Disabled -
Public trackers can benefit from having settings like DHT (Distributed Hash Table) and Peer Exchange (PEX) enabled. These protocols rely on sources besides the trackers to get peers. The following settings are recommended ONLY for public trackers.
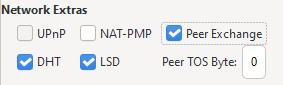
Suggested:
Recommended -
Decent private trackers will use the "private flag" and ignore these settings by default. However, it is strongly recommended that you use the following settings if you use private trackers. Almost all private trackers have rules stating that you must disable DHT, PEX, and LSD/LPD (Local Peer Discovery). Failing to do so puts your account at risk of being disabled.

Suggested:
Disabled
Plugins
Finally, you will want to enable some plugins. There are plenty of plugins on the Deluge community forums to browse once you are familiar with the client, but for the time being, we will only be covering the WebUI and Label plugins to get started.
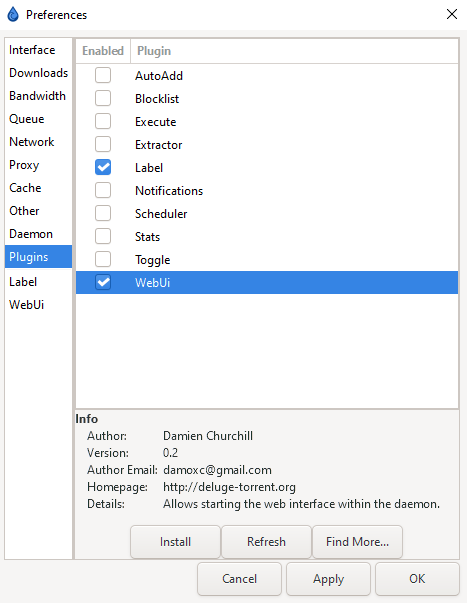
Tip
If you are familiar with the client and plugins you can find more information here
Info
If you are running a Docker container, such as binhex's image, the WebUI plugin may not need to be enabled. Instead, it may be configured in the container.
WebUI
Once you have enabled the WebUI plugin, it will appear in your Preferences menu list, and you will need to enable the web interface and set the port you want the WebUI to listen on.
Info
The default WebUI password is deluge and you can change that in preferences inside the WebUI once you access it through your browser.
Remember your password, we will need this later.
Label
The Label plugin will allow you to categorize/sort your torrents. You can assign one Label per torrent. Starr apps can also use Deluge's labels to help them keep track of downloads and imported torrents.
Labels are a valuable tool, if used properly, to keep your torrents managed and organized.
Questions or Suggestions?
